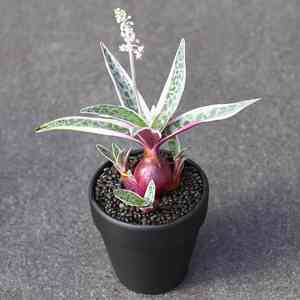
How to Propagate Silver squill?
Silver squill can be multiplied using its underground storage organs, particularly in the springtime. This procedure is quite straightforward, and successful propagation is indicated by the appearance of fresh sprouts from the tubers. Maintain appropriate hydration levels for the best development.
Optimal Time for Silver Squill Propagation
Propagation Method
Utilize The Tubers
Propagation Period
Spring
Tools Required for Silver Squill Propagation
Clean and sharp scissors or pruning shears
These instruments are employed to meticulously detach and sever the tubers or offsets from the primary silver squill plant. A precise cut minimizes harm to plant tissues, reducing infection risk and fostering robust development. Disinfecting blades before use is crucial to prevent disease transmission.
Small pots with drainage holes
Following tuber separation, individual pots are ideal for proper root growth. Drainage holes are vital to prevent waterlogging, which silver squill is particularly vulnerable to. This ensures the medium drains effectively, averting rot in the young plants' delicate roots.
Well-draining potting mix
A blend containing materials like peat, perlite, and sand is recommended for silver squill. These components provide excellent aeration and drainage, essential as silver squill tubers can rot in overly moist conditions. The correct mix supports healthy root growth and prevents soil compaction.
Misting bottle
This device is used to gently hydrate freshly potted tubers without over-saturating or causing soil erosion. A light misting provides necessary humidity for the silver squill without waterlogging the soil, encouraging tuber growth without risk.
Tweezers or a dibber
In certain instances, tubers may be small and fragile. Tweezers or a dibber can assist in carefully handling and placing tubers into the potting mix without damage. This precision tool aids in creating appropriately sized holes and correctly positioning tubers within the pot.
Gloves
Gloves safeguard the propagator's hands and prevent oils or residues from contaminating plant material during handling. They ensure both the propagator's health and the cleanliness of the propagation process.
Label and marker
A plant label and marker are used to record the propagation date and any other relevant details about individual silver squill plants. Tracking plants helps monitor their growth and maintain appropriate care routines.
Procedure for Propagating Silver Squill
Propagation Method
Utilize The Tubers
Difficulty Level
Easy
Post-Propagation Care for Your Silver Squill
Post-Propagation Care for Your Silver Squill
After propagation, position the young silver squill in an area with bright, indirect illumination. Continue using well-draining soil and a pot with drainage holes to prevent water accumulation. Water sparingly, allowing the soil to dry between waterings, and apply a balanced, water-soluble fertilizer at half-strength every 4-6 weeks during the active growth period. Monitor for pests and diseases and maintain temperatures between 60-75°F (15-24°C) for optimal development. Minimize repotting to avoid disturbing the fragile root system, only repotting when growth necessitates it.
Common Errors to Avoid During Silver Squill Propagation
Overwatering
Excessive watering of silver squill can lead to root rot, a frequent problem when the plant sits in saturated substrate for extended periods. This can result in a weakened plant more susceptible to diseases and less likely to survive propagation efforts.
Insufficient lighting
Placing silver squill in inadequate light hinders its photosynthetic efficiency, potentially causing etiolated growth and a lower propagation success rate. Silver squill requires bright, yet indirect, light to flourish.
Incorrect soil mix
Using an unsuitable soil mix that lacks proper drainage can trap moisture around silver squill's roots, potentially causing rot. A well-draining soil mix is vital for the healthy development of bulb and root structures during propagation.
Damaging bulbs during handling
Careless handling of silver squill bulbs can injure them, which may impede or entirely prevent propagation. Gentle handling is crucial to avoid any physical harm to the bulbs, which are essential for propagation.
Tips for Propagating Silver Squill
Bulb division
When propagating silver squill via bulb division, ensure offsets are healthy and intact. Gently separate them from the parent plant during its dormant phase and plant them in a suitable growing medium.
Appropriate substrate
Employ a well-draining substrate, such as a blend of potting soil and perlite or sand, to encourage robust root development and prevent rot. Proper soil composition is critical for successful propagation.
Moderate watering
After planting, water silver squill cautiously. The soil should remain lightly moist but never soggy, especially during the initial growth period post-propagation. This will help new plants establish without the risk of rot.
Proper pot size
Select a pot proportionate to the size of the silver squill bulbs being planted. Oversized pots can retain excessive moisture, while undersized pots may restrict root growth and hinder plant development.


