How to Prune Japanese red cedar?
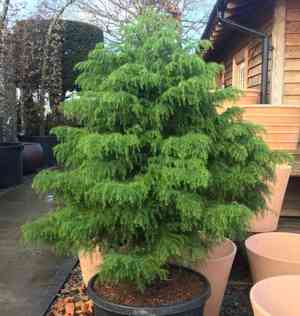
The Japanese red cedar, a coniferous evergreen, is distinguished by its conical form and thick canopy. Trimming should primarily involve excising deceased or fractured limbs and molding juvenile trees for their framework. The most suitable period for this activity is the inactive winter months, which helps to reduce sap leakage and the risk of illness. Enhancing air movement through thinning can avert fungal infections. Furthermore, pruning encourages a denser, more appealing silhouette and can avert problems stemming from excessive growth.
Advantages of Trimming Japanese Red Cedar
Advantages of Trimming Japanese Red Cedar
Trimming japanese red cedar promotes robust development and preserves its desired form. By selectively cutting branches, gardeners can foster healthy, dense foliage and structure, preventing overgrowth and ensuring an attractive appearance.
Optimal Time for Trimming Japanese Red Cedar
Optimal Time for Trimming Japanese Red Cedar
Winter is considered ideal for trimming japanese red cedar because the plant is dormant. During this period, sap flow is minimal, reducing stress on japanese red cedar and lowering the risk of sap loss and disease entry. This season also offers a clear view of the plant's structure, allowing for more strategic cuts. Winter trimming encourages vigorous spring growth, as the plant directs energy into healing pruned areas once the growing season begins.
Tools Required for Trimming Japanese Red Cedar
Hand Pruners
Perfect for making clean cuts on small branches and twigs of japanese red cedar, causing minimal harm to plant tissues.
Loppers
Best for cutting thicker branches that hand pruners cannot manage, providing leverage and extended reach within the canopy of japanese red cedar.
Pruning Saw
Crucial for cutting through the largest branches of japanese red cedar that are too big for hand pruners and loppers, ensuring clean cuts without tearing bark.
Hedge Shears
Useful for shaping the foliage of japanese red cedar if a formal look is desired, but should be used sparingly to avoid excessive thinning.
Pole Pruner
Allows for trimming higher branches of japanese red cedar from the ground, improving safety and accessibility without needing a ladder.
Gloves and Safety Glasses
Important for personal protection when trimming japanese red cedar to prevent injury from sharp tools and falling debris.
How to Trim Japanese Red Cedar
Step1: Timing Trimming for Optimal Healing
Determine the correct time for trimming japanese red cedar, typically late winter or early spring before new growth begins. Trimming at this time helps prevent disease and allows cuts to heal quickly.
Step2: Tool Sterilization Prevents Disease Spread
Sanitize your trimming tools using alcohol or a bleach solution to prevent the spread of diseases.
Step3: Removing Dead Wood Ensures Plant Health
Begin by removing any dead wood. Look for branches that lack green needles or are brittle and break easily. Cut these branches back to their origin point using sharp bypass pruners or a pruning saw for larger branches.
Step4: Diseased Branch Excision to Protect Plant
Inspect japanese red cedar for any diseased branches, indicated by unusual discoloration, growths, or unhealthy-looking bark. Using sterilized tools, cut these branches back to healthy tissue, at least several inches below the affected area.
Step5: Culling Weak Branches for Better Growth
Identify weak branches on japanese red cedar that may be overextended, rubbing against other branches, or poorly attached to the main structure. Remove these to enhance air circulation and light penetration throughout the plant, which can encourage healthier growth and reduce disease risks.
Step6: Thinning for Airflow and Light Penetration
Thin the interior of japanese red cedar by removing some smaller branches to reduce crowding. This promotes stronger growth and increases air and light penetration, but avoid removing more than 1/3 of the plant's foliage in a single year.
Step7: Angled Cuts for Efficient Healing
Make clean cuts at a slight angle, just above a node (where a leaf or branch is attached to the stem), to promote better healing. Avoid leaving stubs, as they can be entry points for pests and diseases.
Step8: Natural Shape Preservation during Trimming
Shaping japanese red cedar should maintain its natural pyramidal form. Avoid excessive topping or shearing, as this can lead to poor growth and diminish the plant's natural beauty.
Step9: Proper Disposal of Trimming Debris
Dispose of the trimmed debris appropriately to reduce the likelihood of spreading any pests or diseases that might have been present.
Step10: Post-Trimming Tool Maintenance
After trimming japanese red cedar, clean and disinfect all tools used and store them properly.
Step11: Monitoring Plant Recovery Post-Trimming
Monitor japanese red cedar over the following weeks to ensure it is healing well and to check for signs of new growth indicating a successful trimming process.
Post-Trimming Care for Japanese Red Cedar
Post-Trimming Care for Japanese Red Cedar
Immediately after trimming japanese red cedar, water the plant deeply to alleviate stress and promote healing. Manage exposure to ensure partial shade while japanese red cedar recovers, maintaining consistent humidity and avoiding temperature extremes. Apply a balanced, slow-release fertilizer to nourish japanese red cedar without causing shock. Regularly inspect for signs of stress, such as wilting or discoloration, and potential infections like resinous sap. Promptly treat any issues with appropriate fungicides or pest control measures, following expert guidance.
Common Trimming Mistakes with Japanese Red Cedar
Over-Trimming and Damaging Plant Shape
Trimming too aggressively which can lead to excessive foliage loss and potential harm to japanese red cedar's natural shape.
Using Dull and Unclean Trimming Tools
Using dull or dirty trimming tools that can cause jagged cuts and increase the risk of disease for japanese red cedar.
Lack of Trimming Strategy for Plant Health
Trimming without a clear purpose or plan, which can result in an uneven or aesthetically displeasing appearance of japanese red cedar.
Common Trimming Tips for Japanese Red Cedar
Sharp, Clean Cuts for Healthy Trimming
Use sharp and clean trimming shears to make precise cuts, which help japanese red cedar recover more quickly and maintain a tidy appearance.
Selective Trimming to Preserve Natural Form
Trim selectively to maintain the tree's natural pyramidal form, focusing on removing only dead, diseased, or crossing branches.
Thinning Over Topping for Growth and Structure
When shaping japanese red cedar, aim to thin rather than topping, as this encourages new growth while preserving the tree's structural integrity.


