How to Prune Japanese cherry?
Distinguished by its elaborate flowers, Prunus serrulata benefits from trimming to preserve its form and foster vitality. Perform pruning operations right before spring development, from late winter to the beginning of spring. Employ thinning cuts to eliminate congested branches and boost light infiltration. Concentrate on removing deceased or ailing wood and intersecting branches that might harm the bark. Proper trimming guarantees better air movement, lowering the chance of disease and stimulating abundant blossoms in the subsequent season. Always sanitize your instruments to avert the dissemination of pathogens.
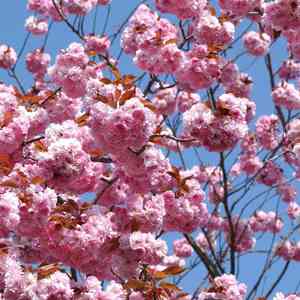
What Are the Benefits of Pruning Japanese Cherry?
What Are the Benefits of Pruning Japanese Cherry?
Trimming japanese cherry is crucial for fostering robust development and an attractive form. Strategic cuts can stimulate vigorous new shoots, enhance flowering, and preserve the iconic ornamental shape of japanese cherry.
What Is the Best Time for Pruning Japanese Cherry?
What Is the Best Time for Pruning Japanese Cherry?
These periods are considered optimal for pruning japanese cherry as they coincide with the plant's dormant phase, reducing stress and the likelihood of disease. Late winter pruning allows japanese cherry to recover quickly when growth resumes in spring, while minimizing impact on flower production, as japanese cherry blooms on old wood. Early spring pruning is also suitable, enabling the removal of any winter damage before new growth begins. This timing ensures japanese cherry's energy is directed towards producing healthy new shoots and maintaining a strong structure, promoting optimal health and a spectacular floral display.
What Tools Do I Need to Prune Japanese Cherry?
Bypass Pruners
Perfect for making precise cuts on japanese cherry's smaller branches, typically up to 1/2 inch in diameter, without causing undue harm to the plant tissue.
Loppers
Recommended for cutting thicker branches on japanese cherry, usually up to 2 inches in diameter, offering longer handles for leverage and extended reach.
Pruning Saw
Utilized for japanese cherry's larger branches exceeding 2 inches in diameter, the saw allows for accurate cuts without tearing the bark, which is vital for the tree's well-being.
Hand Shears
For shaping japanese cherry and performing more delicate, intricate pruning tasks, hand shears enable meticulous snipping of twigs and foliage.
Pole Pruner
Applicable when japanese cherry's branches are beyond normal reach, and there's a need to prune without using a ladder, promoting safety and accuracy.
Wound Sealant
Following large cuts, wound sealant can be applied to japanese cherry's branches to aid healing and prevent disease, though this practice is sometimes debated among experts and should be used cautiously.
How to Prune Japanese Cherry
Step1: Assessment of Plant Health and Structure
Evaluate the overall health and structure of japanese cherry before commencing pruning. Identify any dead wood, diseased limbs, and non-flowering shoots that require attention. Ensure pruning occurs during late winter or early spring when the tree is dormant, to minimize stress and sap loss.
Step2: Sterilization of Pruning Tools
Sanitize your pruning tools with a solution of 1 part bleach to 9 parts water to prevent the spread of disease. Clean the tools again between cuts if you are removing diseased wood.
Step3: Removal of Dead Wood
Begin by removing any dead wood. Cut these branches at the point where they connect to a larger branch or the trunk. Make clean cuts without leaving stubs. Angle the cuts so that water can drain off the wounds, which helps prevent rot.
Step4: Elimination of Diseased Limbs
Inspect japanese cherry for diseased limbs. These limbs may exhibit signs of discoloration, unusual growths, or wounds. Remove these limbs by making cuts into healthy tissue well below the diseased areas to prevent the spread of infection.
Step5: Pruning of Non-Flowering Shoots
Prune non-flowering shoots to encourage more abundant blooming next season. These are typically shoots that grew during the current year. Trim back to a point where there are outward-facing buds to shape japanese cherry and to encourage outward growth.
Step6: Thinning for Light and Air Circulation
Thin out the interior of japanese cherry to enhance light penetration and air circulation. Remove crossing branches and those that grow inward toward the center of the tree. Maintain an open, vase-like structure, which is characteristic of japanese cherry.
Step7: Final Pruning Inspection
Conduct a final inspection of japanese cherry to remove any small twigs or branches that may have been overlooked during the initial pruning steps. This helps to maintain the desired shape and appearance of japanese cherry.
Step8: Disposal of Pruned Material
Dispose of all removed plant material, especially diseased limbs, to prevent the possibility of disease spread. Composting is generally not recommended for diseased plant material.
Step9: Post-Pruning Plant Hydration
Water japanese cherry after pruning to provide moisture and help the tree recover from the stress of pruning. Apply a layer of mulch around the base to retain moisture and regulate soil temperature.
Step10: Monitoring Post-Pruning Recovery
Monitor japanese cherry for signs of new growth and healing throughout the growing season. Ensure that the tree does not show signs of distress, which could indicate the need for additional care or disease treatment.
Post-Pruning Care for Japanese Cherry
Post-Pruning Care for Japanese Cherry
Immediately after pruning japanese cherry, ensure clean cuts to prevent infection. Maintain a humid environment without waterlogging the soil, and place japanese cherry in dappled sunlight. Start fertilization a month post-pruning with a balanced, slow-release fertilizer to encourage recovery. Monitor japanese cherry for wilted leaves or oozing sap as stress signs, and if detected, treat promptly with appropriate fungicide or insecticide. Adjust care as needed in response to japanese cherry's growth and health signs.
Common Pruning Mistakes with Japanese Cherry
Incorrect Pruning Intensity Impacts Health and Bloom
Pruning too much or too little: Gardeners may inadvertently remove too much of japanese cherry's canopy, which can stress the plant and reduce flowering, or prune too sparingly, leading to dense foliage that can hinder sunlight penetration and air circulation.
Damaging Plant with Dull or Dirty Pruning Tools
Using improper pruning tools: Utilizing dull or unclean pruning instruments can damage japanese cherry's branches and create jagged cuts that are more prone to disease and pests.
Spreading Disease by Not Removing Unhealthy Wood
Neglecting to remove diseased or damaged wood: Failure to identify and cut away unhealthy wood can allow diseases to spread throughout japanese cherry, compromising its overall health and aesthetic appeal.
Common Pruning Tips for Japanese Cherry
Ensure Clean and Sharp Cuts with Sanitized Tools
Use sharp, clean cutting tools: Ensure that pruning shears, saws, or loppers are sharp and sanitized before and after pruning to make clean cuts and minimize the risk of infecting japanese cherry with diseases.
Shape for Light and Air with Open Canopy Structure
Focus on shaping and maintaining structure: Aim to create an open canopy that allows light and air to reach the inner parts of japanese cherry, removing any crossing or rubbing branches that can create wounds and entry points for disease.
Selective Pruning for Controlled Growth and Form
Prune selectively for size control and aesthetic: While refraining from heavy pruning, selectively remove branches to control the size and maintain the desired shape of japanese cherry, ensuring cuts are made at a 45-degree angle just above a bud facing the outside of the plant to encourage outward growth.


