How to Prune Scarlet oak?
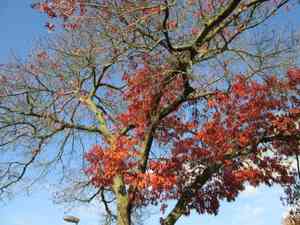
The majestic scarlet oak, a deciduous tree celebrated for its brilliant autumn leaves, thrives with judicious trimming to preserve its vitality and form. Essential methods involve excising deceased or ailing branches, reducing dense limbs, and shortening elongated boughs to foster robust growth habits. Performing this maintenance in late winter or early spring, prior to the emergence of new shoots, is optimal for reducing sap leakage and facilitating wound recovery. Trimming scarlet oak enhances air movement, diminishes pest problems, and encourages strong, symmetrical growth.
What Are the Benefits of Pruning Scarlet Oak?
What Are the Benefits of Pruning Scarlet Oak?
Trimming scarlet oak promotes vigor and preserves its structure. It eliminates dead wood, stimulates new growth, and maintains a robust, attractive form, crucial for this species' well-being and aesthetic appeal.
What Is the Best Time for Pruning Scarlet Oak?
What Is the Best Time for Pruning Scarlet Oak?
Trimming scarlet oak in late winter to early spring allows for the removal of dead or compromised limbs before the new growth cycle begins. This dormant period enables the tree to recover without the strain of active development or harsh weather. Avoiding the tree's active growth phases in spring and summer prevents excessive sap loss, which can weaken scarlet oak. Furthermore, pests and diseases are less likely to infect pruning wounds during cooler temperatures, thus helping to maintain scarlet oak's health. Pruning outside this specific window risks disrupting the formation of new leaves and acorns, vital for the tree's energy production and reproductive success.
What Tools Do I Need to Prune Scarlet Oak?
Bypass Pruners
For precise cuts on smaller scarlet oak branches, typically under 1/2 inch in diameter. Their scissor-like action ensures clean, healthy cuts.
Loppers
These are suitable for cutting branches up to 1 1/2 to 2 inches thick. The long handles provide leverage to cut through thicker scarlet oak branches without causing damage.
Pruning Saw
For larger branches over 2 inches in diameter, a pruning saw is essential. It allows gardeners to make clean cuts on scarlet oak without tearing the bark.
Pole Pruner
For reaching higher scarlet oak limbs without a ladder. Equipped with a saw and lopper on extendable poles, it offers safety and convenience for the gardener.
Hand Shears
Ideal for shaping and trimming smaller scarlet oak branches and foliage, ensuring it keeps its desired form.
Chainsaw
For professional use or when removing very large limbs or making significant structural changes to scarlet oak. This tool should be used with caution and potentially by a professional arborist for safety.
How to Prune Scarlet Oak
Step1: Timing and Preparation for Dormant Pruning
Assess scarlet oak for pruning during its dormant season, ideally late winter, to minimize sap loss and disease spread.
Step2: Sterilization of Pruning Tools
Sanitize pruning tools with a 10% bleach solution or rubbing alcohol to prevent disease transmission between cuts.
Step3: Identification of Dead Wood
Locate dead wood by searching for limbs lacking green buds, having a brittle texture, and darker color. Dead wood will not flex like living branches.
Step4: Three-Cut Method for Dead Wood Removal
Remove dead wood using the 'three-cut method': First, make an undercut about 6-12 inches from the trunk, cutting no more than one-third through the branch. Second, move a few inches past the first cut and cut through the branch from above, allowing the limb to fall without tearing the bark. Lastly, cut the stub just outside the branch collar, where branch and trunk tissue meet, to promote proper healing.
Step5: Removal of Diseased Limbs
Inspect for diseased limbs, indicated by cankers, unusual growths, discoloration, or oozing sap. Use the 'three-cut method' as in Step 4 to remove these limbs, cutting just outside the branch collar.
Step6: Pruning Damaged Branches
Identify damaged branches, which may be split, broken, or hanging. Prune following the 'three-cut method' for larger branches and a single, clean cut for smaller ones, ensuring cuts are made just beyond a healthy bud or branchlet at a slight angle away from the bud.
Step7: Thinning Out Canopy for Light and Air
Thin the canopy to enhance light penetration and air circulation. Selectively remove some smaller, interior limbs using the same clean-cut method as in Step 6.
Step8: Light Shaping and Living Tissue Limitation
Lightly shape scarlet oak, if needed, maintaining its natural form. Avoid excessive pruning; overall, do not remove more than 25% of living tissue in a single year.
Step9: Debris Disposal
Properly dispose of all cut limbs, wood, and debris to reduce the chance of disease or pests harboring in the waste.
Step10: Post-Pruning Watering
Water the tree sufficiently after pruning to reduce stress and encourage healing. Avoid fertilizing immediately after pruning as it can promote too much new growth.
Post-Pruning Care for Scarlet Oak
Post-Pruning Care for Scarlet Oak
Immediately after trimming scarlet oak, ensure clean cuts to prevent disease. Balance light exposure; avoid direct scorching sun but maintain partial sunlight for energy. Adjust humidity and temperature to moderate levels to reduce stress. Apply a balanced fertilizer to replenish nutrients, encouraging healthy regrowth. Regularly monitor scarlet oak for wilting, discoloration, or infection signs. At such indications, promptly treat with appropriate fungicides or pest control measures. Consistent care enhances scarlet oak's post-pruning recovery.
Common Pruning Mistakes with Scarlet Oak
Excessive Canopy Removal
Removing too much of the canopy in one session, which can stress scarlet oak and lead to reduced vigor or increased disease susceptibility.
Improper Branch Cutting Technique
Tearing or ripping branches instead of making clean cuts, damaging scarlet oak's bark and inviting infections or pests.
Incorrect Pruning at Trunk Junction
Trimming branches flush to the trunk, which can harm the branch collar, delaying wound closure and potentially causing damage.
Leaving Stubs on Branches
Leaving stubs when cutting branches, which can lead to deadwood and entry points for disease.
Not Sterilizing Pruning Tools
Failing to sanitize pruning tools between cuts, especially when moving between different scarlet oak trees, increasing the risk of spreading diseases.
Common Pruning Tips for Scarlet Oak
Clean, Angular Cuts Above Buds
Make clean, angled cuts just above a bud facing the outside of scarlet oak's canopy to promote outward growth.
Remove Dead or Damaged Wood
Identify and remove dead, damaged, or diseased wood to maintain scarlet oak's health and appearance.
Maintain Natural Plant Shape
Prune to maintain the natural shape of scarlet oak, following its characteristic growth pattern rather than imposing an unnatural form.
Consider Plant Structure
Consider the overall structure when pruning, retaining a strong central leader and well-spaced lateral branches.
Use Sharp, Appropriate Tools
Use sharp, appropriately-sized tools for the branches being cut to ensure healthy and swift healing of wounds.
Thin Out Crowded Branches
Thinning out crowded branches helps increase air circulation and sunlight exposure, reducing the risk of disease in scarlet oak.
Pruning Paint Usage Guidelines
Apply pruning paint only if recommended by current horticultural guidelines, as scarlet oak typically heals better without it.


