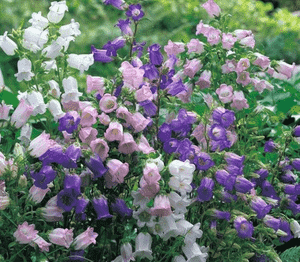
How to Transplant Canterbury bells?
Canterbury bells flourishes when relocated in the pleasant period from mid-spring to late spring, since the warming earth and agreeable temperatures foster robust growth. Select a spot with ample sunlight or partial shade, guaranteeing sufficient hydration. Carefully loosen the earth surrounding the roots for a smooth adjustment.
What Preparations are Needed Before Transplanting Canterbury Bells?
What is the Ideal Time for Transplanting Canterbury Bells?
The optimal period to relocate canterbury bells is from mid to late spring. This offers suitable temperatures for development and allows the plant to settle before summer. Moving canterbury bells during this prime window ensures peak growth, leading to a healthier, more robust plant!
How Much Space Should You Leave Between Canterbury Bells Plants?
When relocating canterbury bells, aim to position them approximately 9-12 inches (23-30 cm) apart. This will enable them to thrive without competing for light or nutrients.
What is the Best Soil Mix for Canterbury Bells Transplanting?
For canterbury bells, prepare well-draining soil enriched with organic material, such as compost or aged manure. Incorporate a balanced, slow-release fertilizer, like 10-10-10, to support vigorous growth.
Where Should You Relocate Your Canterbury Bells?
Select a garden spot where canterbury bells will receive full sun to partial shade. They will benefit from at least 6 hours of sunlight daily, so choose a location with morning sun and afternoon shade.
What Equipments Should You Prepare Before Transplantation Canterbury Bells?
Gardening Gloves
To safeguard your hands while handling soil and plants.
Trowel
For excavating holes in the ground to replant the canterbury bells.
Shovel or Garden Spade
To assist in removing the plant from its initial spot and for digging larger holes if necessary.
Pruning Shears
To trim any dead or damaged roots prior to transplanting.
Watering Can or Hose
To hydrate the plant before and after relocation.
How Do You Remove Canterbury Bells from the Soil?
How Do You Remove Canterbury Bells from the Soil?
From Ground: First, moisten the canterbury bells plant to dampen the soil. Then, excavate a wide trench around the plant using a shovel or spade, ensuring the plant's root ball remains intact. Carefully work the spade beneath the root ball to lift the plant from its original position.From Pot: Hydrate the canterbury bells plant to moisten the soil. Gently invert the pot while carefully supporting the plant at its base. Cradle the root ball with your hand as the plant slides out of the pot.From Seedling Tray: Water the canterbury bells seedlings to facilitate their removal. Using a trowel or your fingers, carefully lift the seedlings from the tray, taking care not to harm the roots or stems.
Step-by-Step Guide for Transplanting Canterbury Bells
Preparation
Ensure the canterbury bells plant is thoroughly watered before commencing the transplanting process. Prepare the new planting site by digging a hole twice as wide and deep as the root ball.
Plant Placement
Position the canterbury bells plant in the hole, making sure the top of the root ball is level with the surrounding ground. Gently backfill the hole with soil, compacting it around the plant to eliminate any air pockets.
Watering
Thoroughly water the canterbury bells plant after transplanting, ensuring the root ball and surrounding soil are well-moistened.
Mulching
Apply a layer of mulch around the base of the canterbury bells plant, leaving a few inches of space between the mulch and the stem to prevent rot.
How Do You Care For Canterbury Bells After Transplanting?
Watering
Keep the soil around the canterbury bells consistently damp, but not waterlogged, for the initial weeks after transplanting to aid in root establishment.
Pruning
Periodically remove any dead or damaged foliage from the canterbury bells plant to encourage healthy growth.
Monitoring
Observe your canterbury bells plant for signs of stress or disease after transplanting and take necessary corrective action to resolve any issues.
Fertilizing
Apply a balanced fertilizer to the canterbury bells plant according to package instructions once it is well-established in its new location.
Troubleshooting Common Issues with Canterbury Bells Transplantation.
What's the best time of year to transplant canterbury bells?
The optimal transplanting period for canterbury bells spans from mid-spring to late spring. This timeframe offers ideal growing conditions for the plant.
Which environment does canterbury bells prefer after transplantation?
Canterbury bells thrives in a sunny or partially shaded environment. A good balance of sunlight and shade promotes vigorous growth.
How should I prepare the soil before transplanting canterbury bells?
Prepare well-drained soil enriched with compost. Canterbury bells prefers neutral to slightly alkaline soil. Ensure the soil is loosened to about 12 inches (30 cm) deep for better root development.
What should be the ideal spacing while transplanting canterbury bells?
A spacing of 9-12 inches (22-30 cm) between each canterbury bells is recommended. This ensures adequate air circulation and room for growth.
When transplanting canterbury bells, how deep should the holes be?
Each transplanting hole should be twice the width and the same depth as the root ball. This provides ample space for the roots to spread and establish firmly.
How to water canterbury bells right after transplanting?
Water canterbury bells thoroughly after transplanting. Ensure the soil is moist but not waterlogged, as excessive watering can lead to root rot.
What kind of care does canterbury bells need post-transplant?
Keep the soil consistently moist, but avoid waterlogging. Fertilize monthly with a balanced fertilizer and mulch around the plant to retain moisture and suppress weeds.
Can canterbury bells be transplanted into a pot?
Yes, canterbury bells can be transplanted into pots. Apply the same care principles as in-ground planting: appropriate spacing, immediate watering, and a sun/partial shade situation.
Do canterbury bells suffer from any common transplanting complications?
Wilting is a frequent issue after transplantation. This typically occurs due to root shock or insufficient watering. Maintaining consistently moist soil can help overcome this.
Can canterbury bells be transplanted along with other plants?
Yes, canterbury bells can be transplanted with other plants, provided they have similar sun, soil, and watering requirements. Remember to avoid overcrowding and maintain good spacing.


