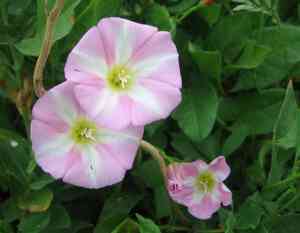
How to Transplant Field bindweed?
For field bindweed to thrive anew, the onset of warmer weather presents the ideal period. Choose sites that receive abundant solar exposure and feature soil with good drainage. To facilitate smoother establishment, exercise care when manipulating the root structure.
What Preparations are Needed Before Transplanting Field Bindweed?
What is the Ideal Time for Transplanting Field Bindweed?
Spring offers the best conditions for relocating field bindweed, with mild temperatures and extended daylight promoting root development. Moving field bindweed during this gentle period supports its growth, as the warming soil and increased light create an optimal setting for field bindweed's new start. Precise timing allows field bindweed to comfortably adapt to its new spot, utilizing the natural growth cycle for strong development. By transplanting under these prime conditions, field bindweed receives the care it needs, setting the stage for a flourishing future.
How Much Space Should You Leave Between Field Bindweed Plants?
When moving your field bindweed, aim for a separation of approximately 2-3 feet (0.6-0.9 meters). This provides ample room for your plants to expand and thrive. Consider it giving each plant its own personal space!
What is the Best Soil Mix for Field Bindweed Transplanting?
For your field bindweed, a well-draining loamy or sandy soil is most suitable. Additionally, enrich the soil with a generous amount of organic compost or a foundational fertilizer before planting. This will supply essential nutrients and encourage robust growth.
Where Should You Relocate Your Field Bindweed?
Your field bindweed thrives in sunlight! Therefore, select a location that receives full sun for the majority of the day. Remember, sufficient sunlight is crucial for your plant's growth and blooming. Happy gardening!
What Equipments Should You Prepare Before Transplantation Field Bindweed?
Gardening Gloves
To safeguard your hands during the process of removing and transplanting field bindweed and working with soil.
Spade or Shovel
Essential for excavating the plant from its original spot without harming the root ball.
Gardening Trowel
Crucial for backfilling and adjusting soil around your field bindweed during transplantation.
Watering Can
For hydrating the plant before and after transplant, which is vital for its survival.
Wheelbarrow
Useful for moving larger plants or significant volumes of soil from one place to another.
Garden Fork
Helpful for gently loosening the soil at the new planting site.
Mulch
Applied after transplant to help retain soil moisture and regulate soil temperature.
How Do You Remove Field Bindweed from the Soil?
How Do You Remove Field Bindweed from the Soil?
From Ground: First, moisten the field bindweed plant's soil. Then, use a shovel or spade to dig a wide trench around the plant, ensuring the root ball remains intact. Carefully work the spade beneath the root ball to lift the plant from its initial location, avoiding damage to the root system.From Pot: Water the field bindweed plant in its container and let it sit for a few minutes to absorb moisture. Gently grasp the stem and tilt the pot sideways, then carefully pull to release the plant and root ball. Keep the root ball as undisturbed as possible.From Seedling Tray: Carefully extract the field bindweed seedling using a spoon or small trowel. Hold the plant by its leaves rather than its stem to prevent injury. Try to retain as much original soil on the roots as possible to minimize disruption.
Step-by-Step Guide for Transplanting Field Bindweed
Digging
Excavate a hole at the chosen spot, ideally twice as wide and nearly as deep as the root ball.
Placement
Position the field bindweed plant in the hole, ensuring the top of the root ball is level with the surrounding ground.
Soil Adjustment
Refill the hole with soil, gently firming it around the plant's base. Avoid compacting the soil too tightly; roots require oxygen.
Watering
Water the plant immediately after transplanting, ensuring the soil is damp but not waterlogged. This will settle the soil around the roots and help the plant recover from transplant stress.
How Do You Care For Field Bindweed After Transplanting?
Watering
Ensure field bindweed receives consistent and adequate watering, based on its moisture needs. Regular irrigation aids in root system establishment.
Weeding
Maintain the area around your field bindweed by removing competing weeds that vie for nutrients and water.
Regular check-up
Inspect your field bindweed regularly for signs of distress, such as wilting or yellowing leaves. If observed, it may need more water, less sunlight, or even a new location.
Coverage
Apply mulch around the base of your field bindweed to retain soil moisture and regulate temperature. Replace mulch as needed, but be careful not to let it touch the plant's stem to prevent rot.
Troubleshooting Common Issues with Field Bindweed Transplantation.
When is the best time to transplant field bindweed?
The optimal period to transplant field bindweed is from early spring to early summer (S1-S3). These seasons offer a balanced environment with sufficient rainfall and sunlight, contributing to successful growth.
How much space should be between each field bindweed plant during transplanting?
You should maintain a distance of 2-3 feet (60-90cm) between each field bindweed plant. This provides the plant ample room to grow and spread without competing for resources.
Why is my transplanted field bindweed wilting?
Field bindweed wilts due to transplant shock or insufficient watering. Ensure the plant is adequately watered and maintain a favorable environment post-transplant for recovery.
My field bindweed is not growing after transplanting. What might be the reason?
This could be due to transplant shock, inadequate sunlight, or poor soil nutrients. Allow the plant time to adjust and ensure it receives enough light and the soil is well-fertilized.
Should I prune field bindweed before transplanting?
Yes, trimming field bindweed before transplanting helps reduce stress and also promotes bushier, healthier growth post-transplant.
How often should I water field bindweed post-transplant?
Immediately after transplanting, water field bindweed thoroughly. Continue this for the initial few weeks. Afterward, the frequency can be reduced depending on the climate and soil moisture.
Can I transplant field bindweed in late summer or fall?
Transplanting in late summer or fall is not recommended for field bindweed as it might not adapt to colder temperatures in time. Early spring to early summer is most ideal.
What type of soil is best for field bindweed transplanting?
Field bindweed prefers well-drained, fertile soil with a pH range between 6.0 to 8.0. If your soil is not ideal, add compost or organic matter to enhance its quality.
How deep should the hole be for transplanting field bindweed?
Dig a hole that is twice as wide and the same depth as the plant's root ball. This allows the roots ample space to spread and establish.
Why are the leaves of my transplanted field bindweed turning yellow?
Yellowing leaves can indicate overwatering or poor drainage. Check if the soil drains properly and adjust watering accordingly. Also, ensure the field bindweed receives sufficient sunlight, as shade can also cause yellowing.


