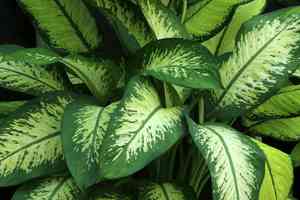
How to Transplant Dieffenbachia?
The ideal period for relocating dieffenbachia is from mid-spring through late-spring, or mid-autumn through late-autumn, since these times offer prime growth environments. During the repotting process, select a spot receiving ample, diffused light, and ensure a stable temperature. Be sure to manage dieffenbachia gently, given its susceptibility to disruption.
What Preparations are Needed Before Transplanting Dieffenbachia?
What is the Ideal Time for Transplanting Dieffenbachia?
The best time to move dieffenbachia is during mid to late spring or autumn. These periods offer moderate temperatures and sufficient moisture, ensuring a smooth transition for this lovely perennial. Happy transplanting!
How Much Space Should You Leave Between Dieffenbachia Plants?
When relocating your dieffenbachia, ensure they are spaced approximately 1-2 feet (30-60 cm) apart. This provides each plant with ample room to develop and thrive.
What is the Best Soil Mix for Dieffenbachia Transplanting?
For optimal development, utilize a well-draining soil blend enriched with organic matter, such as peat moss or compost. Incorporate a slow-release granular fertilizer to boost nutrients and give your dieffenbachia a strong start.
Where Should You Relocate Your Dieffenbachia?
Select a spot that receives bright, indirect sunlight or filtered light, as dieffenbachia prefers diffused light conditions. Avoid placing your plant in direct sun, as it could scorch the leaves.
What Equipments Should You Prepare Before Transplantation Dieffenbachia?
Gardening Gloves
To safeguard your hands while handling soil and the plant.
Shovel or Spade
For excavating the dieffenbachia from its initial spot and digging a new hole for relocation.
Gardening Trowel
Useful for smaller tasks such as moving from pots or loosening the root ball.
Pruning Shears
To trim any damaged roots or foliage prior to transplanting.
Watering Can or Hose
To hydrate the dieffenbachia before and after its relocation.
Organic Compost or Slow-Release Fertilizer
To supply nutrients for the dieffenbachia's establishment and growth in its new environment.
How Do You Remove Dieffenbachia from the Soil?
How Do You Remove Dieffenbachia from the Soil?
- From Ground:First, moisten the dieffenbachia plant's soil. Then, create a wide trench around the plant using a shovel or spade, ensuring the root ball remains intact. Carefully work the spade beneath the root ball to lift the plant from its original position.- From Pot:Water the dieffenbachia plant and allow excess water to drain. Gently tap or compress the pot's sides to loosen the root ball. Invert the pot and slowly slide it off the root ball, supporting the plant from its base.- From Seedling Tray:Water the dieffenbachia seedlings to dampen the soil. Carefully extract the seedling from the tray by holding the stem's base and using a small trowel or your fingers to loosen the surrounding soil. Lift the seedling out, being careful not to harm the roots.
Step-by-Step Guide for Transplanting Dieffenbachia
Digging the Hole
Excavate a hole in the prepared garden bed that is twice as wide and as deep as the dieffenbachia's root ball.
Preparing the Hole
If necessary, blend some organic compost or slow-release fertilizer into the removed soil to provide nutrients for the dieffenbachia plant.
Placing the Plant
Position the dieffenbachia plant in the center of the hole, ensuring the top of the root ball is slightly above the surrounding soil level.
Filling the Hole
Carefully backfill the hole with the amended soil, gently compacting it around the root ball to eliminate air pockets.
Watering
Thoroughly water the dieffenbachia plant, allowing the soil to settle and removing any remaining air pockets.
Mulching
Apply a layer of organic mulch around the base of the dieffenbachia plant, covering the soil without piling it against the stem, to help retain moisture and regulate soil temperature.
How Do You Care For Dieffenbachia After Transplanting?
Monitoring
Observe the dieffenbachia closely after transplanting, looking for signs of shock like wilting or yellowing leaves. Remove any affected foliage to encourage new growth.
Irrigation
Water the dieffenbachia consistently for the initial weeks post-transplant, keeping the soil moist but not saturated. Gradually reduce watering frequency as the plant establishes its root system.
Fertilization
Nourish the dieffenbachia using a balanced, slow-release fertilizer or by top-dressing with compost according to the plant's specific requirements.
Pest Control
Regularly inspect the dieffenbachia for pests and diseases, addressing any issues promptly to ensure a healthy transplant.
Troubleshooting Common Issues with Dieffenbachia Transplantation.
When is the best time to transplant dieffenbachia?
Ideally, relocate dieffenbachia during mid to late spring or mid to late fall, when the weather is mild.
What spacing should I maintain between dieffenbachia plants?
A distance of 1-2 feet (30-60 cm) between dieffenbachia plants is ideal for healthy development.
How much sunlight is ideal for transplanting dieffenbachia?
Dieffenbachia thrives in partial sunlight to bright, indirect light. Avoid direct, intense sunlight.
What should I consider when choosing a pot for dieffenbachia?
Select a pot with drainage holes, large enough for the roots, and 1-2 inches (2.5-5 cm) wider in diameter.
How deep should I plant dieffenbachia during transplantation?
Plant dieffenbachia at the same depth as in its original container, ensuring the roots are fully covered.
How do I prepare the dieffenbachia plant for transplanting?
Gently remove dieffenbachia from its current container, loosening any compacted soil, while keeping the roots intact.
What type of soil is best for transplanting dieffenbachia?
Use rich, well-draining soil with a slightly acidic pH of 6.1-6.5 for robust dieffenbachia growth.
How frequently should I water dieffenbachia after transplanting?
Water dieffenbachia thoroughly after transplanting and maintain consistently moist, but not soggy, soil.
How can I gauge if dieffenbachia is adjusting well after transplant?
Look for new growth, healthy leaves, and a firm stem as indicators of successful dieffenbachia transplantation.
What should I do if my transplanted dieffenbachia shows signs of stress?
Trim damaged leaves, ensure proper light and watering, and consider using a root-stimulating fertilizer to aid recovery.


