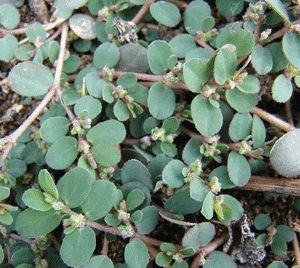
How to Transplant Prostrate sandmat?
The beginning of the cultivation period presents an ideal opportunity for transplanting prostrate sandmat, utilizing the temperate weather for root development. Select sunny, adequately draining locations, carefully encouraging its roots to acclimate, with limited interference.
Essential Preparations Before Relocating Prostrate Sandmat?
Optimal Period for Moving Prostrate Sandmat?
The ideal time for relocating prostrate sandmat is typically the spring season, a period of renewed growth. Early spring offers a perfect window for prostrate sandmat to establish roots successfully, due to mild temperatures and consistent moisture. Transplanting prostrate sandmat during this season aligns with its natural growth cycle, providing a supportive environment for young plants to settle. By transplanting in spring, prostrate sandmat benefits from the entire growing season to mature, ensuring robust development. A friendly tip: moving prostrate sandmat in spring helps avoid the stress of extreme heat or cold, boosting the plant's remarkable vitality!
Recommended Spacing Between Prostrate Sandmat Plants?
When transplanting prostrate sandmat, ensure adequate separation between each plant. Ideally, they should be positioned approximately 8-12 inches (20-30 cm) apart. This provides ample room for growth and prevents competition for nutrients.
Best Soil Blend for Prostrate Sandmat Transplanting?
Prepare your soil for prostrate sandmat. It thrives in well-drained soil. Before planting, enrich the soil with a base fertilizer rich in potassium. This aids in promoting vigorous growth and abundant flowering.
Optimal Location for Relocating Your Prostrate Sandmat?
When deciding where to place prostrate sandmat, light is a crucial element. These plants prefer a sunny spot that receives full sunlight exposure daily. Choose an area that gets at least 6 hours of sunlight each day.
Equipment Required Before Transplanting Prostrate Sandmat?
Gardening Gloves
To safeguard your hands while handling soil and prostrate sandmat.
Shovel or Spade
Necessary for digging the required holes and assisting in removing the prostrate sandmat from its original spot.
Watering Can
You will need this to hydrate your prostrate sandmat after its relocation.
Wheelbarrow
This is useful for transporting larger prostrate sandmat plants or significant quantities of soil.
Garden Trowel
For excavating smaller holes and helping to position the prostrate sandmat in its new location.
Garden Pruners
These will be used to trim the root ball of the prostrate sandmat if needed.
Method for Extracting Prostrate Sandmat from the Soil?
Method for Extracting Prostrate Sandmat from the Soil?
From Ground: Start by gently watering prostrate sandmat to moisten the soil, facilitating easier removal. Using a shovel or spade, carefully dig around the plant, taking care not to damage the root ball. Gradually work the spade beneath to lift the plant from its initial position.From Pot: Water the prostrate sandmat thoroughly until water drains from the pot's bottom, indicating the soil is fully saturated. Turn the pot on its side and gently pull on the plant's stem; if it doesn't slide out easily, squeeze the pot to loosen the soil and try again.From Seedling Tray: Lightly water the tray to dampen the soil. Gently press the bottom of each cell to push up the plant and soil. Carefully hold the prostrate sandmat by its leaves to prevent damage to stems and roots as you lift them.
Step-by-Step Guide for Relocating Prostrate Sandmat
Preparation
Fill the wheelbarrow with water and set it aside. This will be used to keep the prostrate sandmat hydrated during transport.
Digging the Hole
Measure the root ball of the prostrate sandmat; you'll want to create a hole that is 2-3 times wider and as deep as the root ball itself. Avoid digging too deep, as you don't want the prostrate sandmat to sink!
Placing the Plant
Position the prostrate sandmat so it sits level with the ground. Fill the remaining space around the plant with the soil that was initially removed.
Watering
Using the watering can, thoroughly water the prostrate sandmat. Aim to moisten the soil to the same depth as the root ball.
Post-Transplant Care for Prostrate Sandmat?
Weekly Inspection
Ensure you regularly check on your prostrate sandmat after its relocation. Look for any signs of distress such as drooping, wilting, or discolored leaves.
Pruning
Regularly trim dead or dying foliage to encourage healthy growth and prevent any potential spread of disease.
Consistent Watering
While over-watering should be avoided, it's important to keep the soil around the prostrate sandmat consistently moist. This aids in the development of new roots and helps in recovering from transplant shock.
Temperature
Remember that prostrate sandmat prefers temperatures between 65 and 75 degrees Fahrenheit.
Addressing Common Issues with Prostrate Sandmat Transplantation.
When is the best time to move prostrate sandmat?
The optimal season to transplant prostrate sandmat is typically from early to late spring, allowing the plant ample time to establish before the summer heat arrives.
What is the ideal spacing when relocating prostrate sandmat?
The perfect distance between prostrate sandmat plants is 8-12 inches (20-30 cm). This provides sufficient room for their growth without overcrowding, which can lead to poor development and disease.
How do I prepare the soil for moving prostrate sandmat?
Ensure the soil is well-draining and possesses a good balance of nutrients. Also, make sure to remove any perennial weeds from the planting area before transplanting prostrate sandmat.
What is the best way to water prostrate sandmat after transplanting?
Gently but thoroughly water prostrate sandmat immediately after transplanting. Keep the soil moderately moist for several weeks afterward to promote root establishment, but avoid overwatering.
Can prostrate sandmat be moved to both gardens and containers?
Yes, prostrate sandmat plants are adaptable and can be successfully relocated into both garden beds and containers, provided there's adequate drainage and space for growth.
Should I fertilize prostrate sandmat after transplanting?
It's generally beneficial to lightly fertilize prostrate sandmat after transplanting to aid in root establishment and growth. Use a balanced, slow-release fertilizer for optimal results.
How to handle prostrate sandmat during transplanting to prevent damage?
Handle prostrate sandmat gently during relocation. Try not to touch the stem or roots directly. If possible, carry the plant by the root ball or the pot.
What should I do if prostrate sandmat leaves turn yellow after transplanting?
Yellowing leaves could indicate overwatering, underwatering, or a nutrient deficiency. Adjust the watering frequency and consider applying a balanced fertilizer.
Can prostrate sandmat be transplanted in full sun?
Prostrate sandmat tolerates a range of light conditions, including full sun. However, it does appreciate some afternoon shade during the hottest part of the day.
What care is needed after relocating prostrate sandmat?
After transplanting, regularly water prostrate sandmat and monitor for pests or diseases. It also benefits from a layer of mulch to retain moisture and reduce weed competition.


