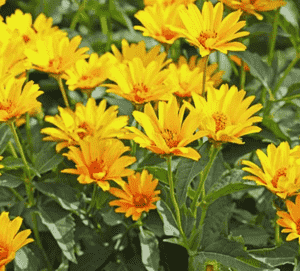
How to Transplant Jerusalem artichoke?
The ideal period for relocating jerusalem artichoke is in the mild temperatures of early spring, enabling robust root development. Ensure you select a bright spot with soil that drains effectively for peak growth. Remember to allow sufficient room, as jerusalem artichoke tends to proliferate readily.
What Preparations are Needed Before Transplanting Jerusalem Artichoke?
What is the Ideal Time for Transplanting Jerusalem Artichoke?
Early spring, as nature awakens, is the perfect period to relocate jerusalem artichoke. Moving jerusalem artichoke at this time encourages strong development and impressive blooms, benefiting from moist soil and milder weather. This proactive approach ensures jerusalem artichoke establishes roots well before summer's harsh conditions. Remember, a successful early spring transplant of jerusalem artichoke promises a summer of beautiful flowers and abundant tubers, enhancing your garden's unique appeal.
How Much Space Should You Leave Between Jerusalem Artichoke Plants?
For jerusalem artichoke, position your transplants approximately 12-18 inches (30-45 cm) apart. This spacing guarantees each plant ample room to grow and access necessary nutrients and water from the soil.
What is the Best Soil Mix for Jerusalem Artichoke Transplanting?
Prior to transplanting jerusalem artichoke, prepare well-draining soil enriched with a foundational fertilizer to support its growth. An optimal blend includes loamy and sandy soil mixed with organic matter such as compost.
Where Should You Relocate Your Jerusalem Artichoke?
Select a sunny spot receiving 6-8 hours of direct sunlight for transplanting your jerusalem artichoke. This plant thrives in full sun, so choose an area in your garden that gets ample daily sunshine.
What Equipments Should You Prepare Before Transplantation Jerusalem Artichoke?
Gardening Gloves
To handle soil and plants without harming your hands.
Garden Shovel
For excavating the planting hole in the ground.
Garden Spade
To carefully loosen the soil around the plant's roots in its original spot.
Garden Fork
Can be used to lift the plant from its initial location without damaging its root system.
Watering Can or Hose
To provide water to the plant after relocation.
Mulch
To help maintain soil moisture after transplanting the jerusalem artichoke.
Organic Compost
To enrich the soil and supply essential nutrients for healthy growth, as jerusalem artichoke is a heavy feeder.
Garden Trowel
For firming the soil around the plant after transplanting.
How Do You Remove Jerusalem Artichoke from the Soil?
How Do You Remove Jerusalem Artichoke from the Soil?
From Ground: First, lightly water the jerusalem artichoke to soften the soil around the root area. Carefully dig around the plant with a garden spade or fork, leaving sufficient space to keep the root system intact. Gently lift the plant, aiming to preserve as many tubers as possible attached to the plant—this can be made easier by loosening the soil with a garden fork before lifting.From Pot: Water the potting medium to facilitate root ball separation from the pot. Invert the pot while securely holding the jerusalem artichoke at the stem's base. The plant should slide out; if not, gently tap the pot's base.From Seedling Tray: Water the tray before removing seedlings. Using a plant label or small tool, gently pry the jerusalem artichoke from its cell, always handling the plant by its leaf and never its stem.
Step-by-Step Guide for Transplanting Jerusalem Artichoke
Plant Selection
Ensure you select healthy, disease-free plants for transplanting.
Digging The Hole
Use a garden shovel to dig a hole wide enough to accommodate the plant's root system. For the jerusalem artichoke, the hole should be at least 5 inches deep as it is a deep-rooted plant.
Placing the Plant
Position the plant in the hole. The top of the root ball should be level with the surrounding soil surface.
Putting Soil Back
Refill the hole with the excavated soil and gently firm it around the plant with a garden trowel.
Watering
Water thoroughly to settle the soil around the plant. Use a watering can or hose, ensuring water reaches the root zone, not the plant's leaves.
Mulching
Finally, spread a layer of mulch around the plant. This will help retain soil moisture and suppress weeds.
How Do You Care For Jerusalem Artichoke After Transplanting?
Watering
Immediately after transplanting, jerusalem artichoke needs frequent watering, but avoid overwatering to prevent root rot. Keep the soil moist until the plant establishes itself.
Weed Control
Regularly check for and remove weeds around the plant, as they compete with jerusalem artichoke for nutrients. Applying mulch can help deter weed growth.
Observation
Monitor the jerusalem artichoke closely. Look for any signs of transplant shock, such as wilting, yellowing, or leaf drop. If observed, consider using a shade cloth to reduce plant stress.
Troubleshooting Common Issues with Jerusalem Artichoke Transplantation.
What's the ideal timing to transplant jerusalem artichoke?
The best time to transplant jerusalem artichoke is in early spring when new growth begins.
What specific spacing is recommended for jerusalem artichoke?
You should space jerusalem artichoke tubers approximately 12-18 inches (30-45 cm) apart to encourage healthy development.
How deep should I plant the jerusalem artichoke tubers?
Dig a hole deep enough to place jerusalem artichoke tubers about 2-3 inches (5-8 cm) below the soil surface.
Why are my transplanted jerusalem artichoke wilting or drooping?
Wilting may result from insufficient watering after transplant or transplant shock. Allow them time and provide consistent moisture.
Are there any specific soil conditions needed for transplanting jerusalem artichoke?
Jerusalem artichoke thrives best in well-draining soil. A slightly acidic to neutral pH range is most beneficial for its growth.
Why aren't my transplanted jerusalem artichoke tubers sprouting?
Tubers may fail to sprout due to excessively dry or wet conditions, inadequate sunlight, or poor soil nutrients.
Can jerusalem artichoke be transplanted in a container?
Yes, jerusalem artichoke can be grown in large, deep containers. Just ensure adequate drainage and space for tubers to expand.
What if jerusalem artichoke shows yellow leaves after transplanting?
Yellow leaves might indicate overwatering or a nutrient deficiency. First, adjust watering practices, then consider a balanced fertilizer.
Are there any pests or diseases I should watch out for when transplanting jerusalem artichoke?
Jerusalem artichoke generally has few pest or disease issues, but be vigilant for aphids, powdery mildew, and early blight symptoms.
How should I water newly transplanted jerusalem artichoke?
Water thoroughly immediately after transplanting. Afterward, continue with deep but infrequent watering sessions to promote deep root growth.


