How to Transplant Creeping juniper?
The ideal period for relocating creeping juniper is in early spring, as the plant's developmental phase recommences. Select a site featuring permeable soil and ample solar exposure. Bear in mind that a delicate approach during this procedure aids creeping juniper in establishing itself without difficulty.
What Preparations are Needed Before Transplanting Creeping Juniper?
What is the Ideal Time for Transplanting Creeping Juniper?
Consider early spring, the start of the growing season, as the prime time to move your creeping juniper. This favorable period allows creeping juniper ample opportunity to develop strong roots prior to the hot summer months. A robust establishment ensures a healthier, more vigorous creeping juniper, ultimately enhancing its year-round appeal. Do not overlook this crucial step in your plant care routine!
How Much Space Should You Leave Between Creeping Juniper Plants?
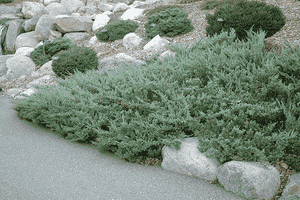
When relocating creeping juniper plants, ensure they have ample room to expand. Aim for a separation of approximately 5-6 feet (1.5-1.8 meters) between each specimen. This will aid in their flourishing!
What is the Best Soil Mix for Creeping Juniper Transplanting?
For soil preparation, creeping juniper prefers well-draining soil with a pH that is slightly acidic to neutral. Incorporate some compost or slow-release granular fertilizer to give them a healthy start. This will establish an optimal base for your new plants.
Where Should You Relocate Your Creeping Juniper?
Select a site for your creeping juniper plants that receives full sun or partial shade. They require at least 6 hours of direct sunlight daily, but can endure some shade. This will ensure your plants grow strong and healthy!
What Equipments Should You Prepare Before Transplantation Creeping Juniper?
Gardening Gloves
To safeguard your hands while handling soil and the creeping juniper plant.
Shovel or Spade
For excavating holes and trenches needed for removing and relocating creeping juniper.
Trowel
To easily transfer soil during the transplanting process.
Watering Can
To irrigate both the original and new planting sites.
Pruner
To trim any damaged or dead branches of creeping juniper before relocation.
Soil Amendment (Optional)
To blend into the planting hole for enhanced soil conditions, if required.
Mulch
To apply around creeping juniper after transplanting to help retain moisture.
How Do You Remove Creeping Juniper from the Soil?
How Do You Remove Creeping Juniper from the Soil?
From Ground: First, hydrate the creeping juniper plant to moisten the soil. Then, excavate a wide trench around the plant using a shovel or spade, ensuring the plant's root ball remains intact. Carefully work the spade beneath the root ball to lift the plant from its initial position.From Pot: If the creeping juniper plant is in a container, water the soil to make it damp and moist. Gently turn the pot on its side and lightly tap the container's edges to help loosen the roots. Grasp the plant at its base with one hand while slowly sliding the pot off with the other hand.From Seedling Tray: Water the creeping juniper seedling to dampen the soil before removal. Gently use your fingers or a fork to ease the seedling and its root ball out of the tray, taking care not to harm the roots during extraction.
Step-by-Step Guide for Transplanting Creeping Juniper
Plant Removal
Follow the extraction procedure outlined above based on the original location of your creeping juniper plant (ground, pot, or seedling tray).
New Hole Preparation
Using a shovel or spade, dig a hole in the new location that is two to three times the width and slightly shallower than the root ball of the creeping juniper plant.
Soil Amendment(Optional)
If necessary, mix the soil amendment into the soil at the base of the hole to improve soil quality.
Placement
Carefully lower the creeping juniper plant into the hole. Adjust the depth of the hole if needed, to ensure that the top of the root ball is level with or slightly above the surrounding soil.
Filling
Gently backfill the hole with soil, ensuring no air pockets remain around the root ball. Press the soil lightly around the plant's base to help stabilize and secure it.
Watering
Thoroughly water the relocated creeping juniper plant to help settle the soil and provide moisture for the roots.
Mulching
Apply a layer of mulch around the base of the creeping juniper plant to help retain moisture and inhibit weed growth.
How Do You Care For Creeping Juniper After Transplanting?
Watering
Water the creeping juniper plant consistently for the initial weeks after transplanting, keeping the soil moist but not waterlogged to aid in establishing strong roots.
Pruning
Remove any additional damaged, diseased, or dead branches that may appear after transplanting to encourage new growth and maintain good health.
Monitoring
Observe the progress of your creeping juniper plant, looking for signs of stress or transplant shock, and address any issues as they arise.
Fertilizing (Optional)
Apply a slow-release fertilizer around the base of the creeping juniper plant in the second year after transplanting to promote growth, if needed.
Troubleshooting Common Issues with Creeping Juniper Transplantation.
When is the optimal time to transplant creeping juniper?
The most suitable period for relocating creeping juniper is when the winter thaw begins, typically in early spring.
What is the recommended spacing between creeping juniper plants?
For the best growth and coverage, place your creeping juniper plants 5-6 feet (1.5-1.8 meters) apart.
What should I do if the creeping juniper isn't thriving after transplantation?
First, ensure it's getting adequate sunlight. If it is, inspect for pests or diseases. Also, consider whether the soil has sufficient drainage.
How do I ensure healthy growth of the transplanted creeping juniper?
Regularly water the creeping juniper but avoid waterlogging the soil. Remember foliage thrive in well-drained soil. A layer of mulch can help maintain the soil moisture.
What size should the hole for transplanting creeping juniper be?
The hole should be twice as wide and equally as deep as the root ball. This allows the roots enough room to spread and grow.
What should I do if the leaves of my transplanted creeping juniper start to yellow?
Yellowing leaves might indicate over-watering or poor drainage. Try cutting back on watering and ensure the soil drains well.
How often should I water my transplanted creeping juniper?
Water creeping juniper deeply after transplant to settle the soil and then 1 inch (2.5 cm) of water per week thereafter.
My transplanted creeping juniper looks wilted, what could be the problem?
Wilting often indicates stress due to transplant shock. Maintaining a consistent watering schedule and applying a root growth stimulant can help.
How should I prepare the soil before transplanting creeping juniper?
Clear the area of weeds and debris, and enrich the soil with compost or organic matter to boost nutrients.
Should I prune creeping juniper before or after transplanting?
Prune creeping juniper lightly, if necessary, before transplanting to reduce stress. Wait to hard prune until after the plant has established in its new spot.


