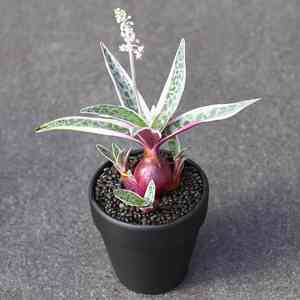
How to Transplant Silver squill?
The ideal window for relocating silver squill is the invigorating stretch from early to mid-spring. It's crucial to select a site with good drainage that provides ample, filtered illumination. During the transplanting process, gently manage silver squill to prevent harm to its fragile bulbs. A tender approach will guarantee a flourishing, contented plant!
What Preparations are Needed Before Transplanting Silver Squill?
What is the Ideal Time for Transplanting Silver Squill?
Initiate the transplanting procedure from early spring into the peak of the season. Relocating silver squill at this time revitalizes the plant post-winter dormancy, fostering a robust growth phase. This period typically offers stable environmental conditions, perfect for root establishment. This precisely timed transplant can significantly benefit silver squill, ensuring a flourishing and productive year.
How Much Space Should You Leave Between Silver Squill Plants?
When transplanting your silver squill, it's advisable to provide ample room for development. Position them approximately 4-6 inches (10-15 cm) apart to allow sufficient space for successful growth.
What is the Best Soil Mix for Silver Squill Transplanting?
To create an optimal setting for your silver squill, prepare a well-draining soil blend with sand and loam, or utilize a commercial cactus mix. For initial fertilization, a slow-release granular type works effectively to supply nutrients throughout its growing period.
Where Should You Relocate Your Silver Squill?
When selecting a new spot for your silver squill, choose an area with bright, indirect sunlight. Excessive direct sun can harm the foliage, so partial shade or filtered light through taller plants will offer the most favorable conditions.
What Equipments Should You Prepare Before Transplantation Silver Squill?
Gardening Gloves
To protect your hands during the relocation process.
Trowel
To excavate the hole for your silver squill without disturbing nearby plants.
Pruning Sheers
To remove any dead or damaged parts of the plant prior to transplanting.
Watering Can
To gently hydrate your plant, minimizing soil disturbance around the new planting site.
Wheelbarrow
To move your silver squill plant from its original spot to the intended location if necessary.
How Do You Remove Silver Squill from the Soil?
How Do You Remove Silver Squill from the Soil?
From Ground: It's uncommon to find silver squill in the ground as they are typically grown in containers, but if so, begin by watering the plant a day beforehand to soften the soil and make it easier to work with. Using a trowel, carefully dig around the plant, ensuring not to harm the bulbs. Gently work underneath to lift the plant.From Pot: First, water the silver squill as moist soil adheres to the roots, providing them comfort during this procedure. Carefully invert the pot, gently extracting the root ball. Be sure not to pull or force the plant, which could damage the bulbs.From Seedling Tray: Remove the silver squill from their seedling tray by carefully pushing the plant from the bottom. Loosen compacted roots and handle the seedling by its leaves to prevent stem damage.
Step-by-Step Guide for Transplanting Silver Squill
Preparation
Thoroughly water your silver squill a day before its relocation. This will help prevent transplant shock.
Digging Hole
Using your trowel, excavate a hole in the chosen location that is twice the size of the silver squill's root ball. This extra space will promote proper root development.
Inserting Plant
Position the silver squill in the hole, placing it at the same depth it was previously growing. Cover the plant with soil, gently pressing down to eliminate any air pockets.
Watering
Once planting is complete, thoroughly water your silver squill using a gentle stream from the watering can.
How Do You Care For Silver Squill After Transplanting?
Watering
Following transplantation, the silver squill requires consistent, but not excessive, watering. Ensure the soil remains slightly moist but never waterlogged.
Pruning
Trim off any unhealthy-looking leaves after transplant to encourage more vigorous growth. Monitor for pests or diseases, and treat as needed.
Temperature
Place your silver squill in an area where the temperature ideally ranges between 60-75 degrees F. Despite being a resilient plant, silver squill does not tolerate extreme temperature fluctuations.
Repotting
Unlike other plants, silver squill thrives when root-bound, so try to avoid frequent repotting.
Troubleshooting Common Issues with Silver Squill Transplantation.
What is the ideal period for transplanting silver squill?
The optimal time to transplant silver squill is from the beginning of spring to mid-spring, providing a favorable environment for growth.
How should I prepare the new location before transplanting silver squill?
Ensure the new site has nutrient-rich, well-draining soil. Loosen the soil 10 inches (25cm) deep, incorporating compost for added nutrients.
What's the suitable spacing when transplanting silver squill?
Spacing is crucial for silver squill's growth. Allow a distance of approximately 4-6 inches (10-15 cm), promoting air circulation while minimizing disease spread.
How should I handle silver squill during the transplanting process?
Avoid damaging the roots during removal and relocation. Carefully dig around and beneath silver squill when moving it from its old to its new spot.
Should I water silver squill immediately after transplanting?
Yes, watering silver squill right after transplanting is essential. This helps settle the soil and establish the plant in its new location.
What's next after transplanting silver squill?
Observe silver squill for any signs of stress after transplanting. If leaves yellow or drop, adjust care as necessary.
Should I fertilize silver squill after transplantation?
Wait for about 1-2 weeks for silver squill to adapt before applying a balanced, slow-release fertilizer, which aids recovery and promotes new growth.
What if the leaves of silver squill wilt after transplantation?
Wilted leaves indicate stress. Ensure silver squill receives adequate sunlight, water, and that its environment maintains a consistent temperature.
How do I manage significant root loss during transplantation?
In cases of substantial root loss, prune back silver squill's top growth proportionally. This reduces the plant's water demand and accelerates its recovery period.
What if silver squill shows no growth weeks after transplant?
Allow silver squill time to establish in its new location. However, if there's no improvement after several weeks, consider seeking expert advice.


