How to Prune Oyster plant?
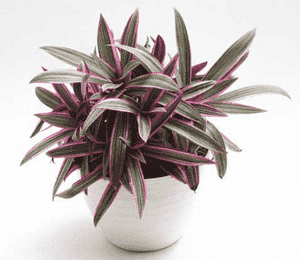
Distinguished by its vibrant leaves and rosette-like growth pattern, the oyster plant thrives with consistent pruning. Remove any yellowed or compromised foliage from the base to promote a denser appearance. From early spring through late autumn, strategically thin out congested stems to enhance airflow and light exposure, thereby cultivating a robust, flourishing specimen. Trimming encourages fresh development and preserves an appealing form, simultaneously aiding in disease prevention. Ensure all implements are disinfected to preclude the introduction of harmful microorganisms.
What Are the Benefits of Pruning Oyster Plant?
What Are the Benefits of Pruning Oyster Plant?
Trimming oyster plant promotes more robust development by stimulating fresh growth. Regular cutting helps maintain its distinct form, ensuring it stays an attractive, compact specimen.
What Is the Best Time for Pruning Oyster Plant?
What Is the Best Time for Pruning Oyster Plant?
These periods are considered ideal for several reasons related to oyster plant's development and well-being. In early spring, oyster plant is emerging from its dormant winter phase, making it an opportune moment to prune without causing plant stress. This timing allows for the encouragement of new growth throughout the active growing season. Late autumn is also suitable as the plant begins to slow down in preparation for dormancy, enabling the removal of any damaged or overgrown foliage without significantly affecting the plant's vitality. Furthermore, since oyster plant lacks a notable flowering or fruiting period that would necessitate pruning considerations, these seasons are perfect for maintenance trimming to foster a desirable shape and size.
What Tools Do I Need to Prune Oyster Plant?
Sharp Scissors or Snips
Ideal for routine maintenance trimming of oyster plant. Given its relatively soft stems, a sharp pair of scissors or snips ensures a quick, clean cut without harming the plant's delicate tissues.
Hand Pruners or Secateurs
Perfect for removing thicker stems or for more precise work on oyster plant. They provide a clean cut and minimize the risk of bruising or tearing the stems, which can lead to disease.
Gloves
Protection for the gardener's hands when handling oyster plant, as its sap might cause skin irritation.
Disinfectant for Tools
To prevent the spread of diseases, it is crucial to sanitize tools before and after pruning oyster plant.
Gardening Shears
For shaping or managing overgrown clumps of oyster plant. Shears are useful for uniformly trimming multiple stems at once.
How to Prune Oyster Plant
Step1: Inspect Plant for Unhealthy Growth
Examine oyster plant for yellow leaves, dead leaves, and withered branches, as these are common indicators that pruning is necessary. Check the plant from all angles to ensure no parts are overlooked.
Step2: Sanitize Pruning Tools
Sanitize pruning shears or scissors with rubbing alcohol or a 10% bleach solution to prevent disease transmission. Clean tools are essential for healthy pruning cuts.
Step3: Remove Yellow Leaves at Base
Begin by removing yellow leaves at the stem's base, close to their connection with the main plant. Pinch or cut them cleanly without tearing to avoid damaging the healthy parts of oyster plant.
Step4: Eliminate Dead Leaves
Identify and remove any dead leaves that may be brown, crispy, or completely dried out. These can be gently plucked by hand if loose or cut with shears if more firmly attached.
Step5: Prune Withered Branches
Locate withered branches, which are stems that have lost their vitality, often appearing brown and dried. Cut these branches back to a healthy section using a 45-degree angled cut just above a leaf node or a branching point.
Step6: Shape Plant Post-Pruning
After removing unhealthy parts, assess oyster plant for its shape. If needed, trim any excessively long or unruly branches to maintain a compact, bushy appearance. Always make cuts just above leaf nodes to encourage new growth.
Step7: Dispose of Pruning Debris
Clear away all pruned material from around oyster plant to promote good air circulation and prevent potential issues with rot or pests.
Step8: Water Plant to Aid Recovery
Water oyster plant after pruning to help reduce stress and support recovery. Ensure the soil is evenly moistened but not waterlogged.
Step9: Monitor Plant for New Growth
Monitor oyster plant over the next few weeks to observe its response to pruning. New growth should emerge where cuts were made. Continue to provide proper care, including indirect sunlight and regular watering.
Post-Pruning Care for Oyster Plant
Post-Pruning Care for Oyster Plant
After pruning oyster plant, promptly remove cuttings to prevent pest harborage. Maintain bright, indirect light and consistent humidity; oyster plant thrives around 40-50%. Avoid direct sunlight, which can stress freshly cut areas. Slightly reduce watering to match oyster plant's decreased transpiration needs. Apply a balanced, water-soluble fertilizer after pruning to encourage growth. Regularly inspect oyster plant for signs of stress, such as wilting or discoloration. If infection signs appear, isolate the plant and apply a suitable fungicide or bactericide.
Common Pruning Mistakes with Oyster Plant
Over-pruning Shocks Plant
Pruning too much at once can shock oyster plant, causing stress that may lead to poor growth or increased susceptibility to disease.
Improper Tool Maintenance Harms Plant
Using dull or dirty pruning tools can result in jagged cuts or the transmission of pests and diseases to oyster plant.
Inhibiting Growth by Pruning New Tips
Removing new growth tips can inhibit the natural bushy appearance of oyster plant, as these are the points where new leaves will form.
Uninformed Pruning Affects Plant Shape
Pruning without an understanding of the plantâs growth pattern may lead to an unbalanced shape, negatively impacting oyster plant's aesthetic appeal.
Not Removing Dead Leaves Promotes Disease
Neglecting to remove dead or yellowing leaves, which can encourage the growth of unwanted organisms that might harm oyster plant.
Common Pruning Tips for Oyster Plant
Use Sharp, Clean Shears for Healthy Cuts
Always use sharp, clean pruning shears to make clean cuts, which will heal faster and minimizes stress on oyster plant.
Prioritize Dead or Damaged Leaf Removal
Focus on removing dead or damaged leaves first, as this helps prevent the spread of potential diseases and encourages healthier growth in oyster plant.
Pinch Back Shoots for Bushier Growth
To maintain the desired shape and encourage bushier growth, pinch back the tips of growing shoots of oyster plant regularly.
Cut Above Leaf Nodes to Encourage Branching
When cutting back leggy stems, make your cuts just above leaf nodes to encourage branching and to keep oyster plant looking full.
Thin Foliage to Boost Air Circulation
Conduct selective thinning of the foliage to enhance air circulation, which can reduce the likelihood of fungal issues in oyster plant.


