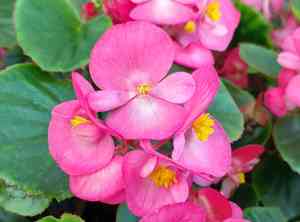
How to Transplant Hardy begonia?
To ensure robust growth for hardy begonias, relocate them between the beginning of summer and early fall. Select a spot with partial shade to preserve their vivid leaves. Remember to place them in soil that drains effectively, with approximately 18 inches of space between each plant, for the best outcome.
Necessary Preparations Before Moving Hardy Begonia?
Optimal Period for Relocating Hardy Begonia?
The best time for moving hardy begonia spans from early summer to the beginning of autumn. This timeframe offers ideal temperatures for hardy begonia to flourish. Transplanting during this window encourages robust development, giving hardy begonia the best chance for a vigorous existence. It's truly rewarding to see your beloved hardy begonia thrive in these seasons!
Required Spacing Between Hardy Begonia Plants?
When relocating hardy begonia, aim for a separation of approximately 8-12 inches (20-30 cm) between individual plants. This ensures each plant has ample room to grow and develop appropriately.
Best Soil Blend for Hardy Begonia Relocation?
For hardy begonia, select a well-draining soil rich in organic matter. Incorporate a slow-release, all-purpose fertilizer (such as 10-10-10 NPK) to supply essential nutrients throughout the growing period.
Where to Replant Your Hardy Begonia?
Regarding sunlight, hardy begonia thrives in a spot offering filtered light or partial sun. A location beneath a tree with dappled sunlight or a bright, east-facing area will keep your plant content and healthy.
Equipment to Prepare Before Transplanting Hardy Begonia?
Gardening Gloves
To safeguard your hands while handling soil and the plant.
Shovel or Spade
For extracting the hardy begonia from its current spot and excavating a new hole at the relocation site.
Gardening Trowel
Useful for removing smaller plants or those cultivated in pots or seedling trays.
Bucket or Wheelbarrow
To move the plant from its original position to its new planting location.
Mulch
To help the plant retain moisture after being moved.
Watering Can or Hose
For hydrating the plant both before and after its transfer.
How to Extract Hardy Begonia from the Soil?
How to Extract Hardy Begonia from the Soil?
From Ground: First, moisten the hardy begonia plant to dampen the soil surrounding its roots. Next, use the shovel to dig a circle around the plant, ensuring it's wide and deep enough to encompass the plant's root system. Carefully maneuver your shovel beneath the root ball and lift the plant from its initial spot.From a Pot: Begin by watering the hardy begonia to facilitate its removal. Place your hand on the soil surface and gently invert the pot to release the plant. If it resists, tap the pot's edges to loosen the soil.From Seedling Tray: Water the tray prior to starting. Then, gently grasp the hardy begonia by its stem, apply slight pressure to the cell's bottom, and lift the plant out. Endeavor to avoid disturbing the roots during this process.
Step-by-Step Guide for Relocating Hardy Begonia
Preparation
Before relocating, thoroughly water the hardy begonia a day in advance. This will simplify removal and reduce stress for the plant.
Excavating New Hole
The new cavity should be twice as wide and equally deep as the root ball. Keep the excavated soil nearby.
Positioning the Plant
Place the hardy begonia in the center of the hole, ensuring it's neither too deep nor too shallow. The top of the root ball should be level with the ground.
Backfilling the Hole
Refill the hole with the displaced soil. As you backfill, gently compact the soil around the base of the hardy begonia to keep it upright.
Finishing Touches
Apply a layer of mulch around the plant, leaving a space around the stem to deter rot and pests. Finally, thoroughly water the plant.
How to Care for Hardy Begonia After Relocation?
Watering
For the initial week, water the hardy begonia daily, then adjust to a schedule that maintains consistent soil moisture, preventing waterlogging.
Monitoring
Watch for indications of transplant shock, such as wilting, yellowing, or dropped leaves. These may suggest hardy begonia requires additional attention. If conditions don't improve, consult a gardening expert or local nursery.
Protection
Depending on the season and local wildlife, consider using a protective barrier to shield the newly relocated plant from pests or frost if necessary.
Resolving Common Issues with Hardy Begonia Relocation.
When is the correct time to move hardy begonia?
The optimal period to transfer hardy begonia spans from the beginning of summer to the start of fall.
What is the appropriate spacing for moving hardy begonia?
To allow hardy begonia sufficient room to expand, position them approximately 8-12 inches (20-30 cm) apart.
What to do if hardy begonia leaves begin to wilt after relocation?
If hardy begonia's leaves wilt, it could be due to transplant shock. Water thoroughly; a root stimulator can be beneficial.
How can I ensure my relocated hardy begonia establishes quickly?
Enrich the planting hole with compost before relocation. This provides nutrients and aids hardy begonia in quick establishment.
Why is my newly relocated hardy begonia turning yellow?
Yellowing often signals overwatering or inadequate drainage. Ensure the soil drains well and avoid overwatering hardy begonia.
How deep should I plant my hardy begonia during relocation?
Dig a hole as deep as the root ball of hardy begonia when relocating to ensure it's securely anchored.
Should I prune hardy begonia during relocation?
Yes, trim off any damaged or decayed parts of hardy begonia during relocation to encourage healthier growth.
What type of soil is best when relocating hardy begonia?
Hardy begonia thrives in fertile, well-draining soil. Improve heavier soil types with organic matter for superior results.
Should I water hardy begonia immediately after relocation?
Absolutely! Giving hardy begonia a good soak right after relocation helps settle the soil around its roots.
My hardy begonia isn't flowering after relocation, what should I do?
Be patient. It takes time for hardy begonia to adapt to its new environment. Maintain proper care, and it should bloom soon.


